tips on being an indoor perilla mom


oh why hello there!
i missed writing and sharing things with you here on my blog. wherever you are, i hope that things have been at the least, a little better and looking up for you.
over here in greenpoint, i’ve been working from home and also settling into my new-ish apartment. i spent the past few months decorating the apt, marie kondo-ing, getting into the groove of new personal rhythms, and shaking some booty. I’ve also gotten into the daily routine of going to bed and waking up listening to the news with the hope that the Covid situation is improving so that i can finally see my families. I’ve also been in pursuit of perfecting the open faced tuna sandwich, and even went so far as tossing mango into the tuna salad mix. i’d like to report back that mango tuna sandwiches shouldn’t really be a thing…
one exciting thing that did come out of staying quarantining 24-ish/7 this year is that i became a parent to 70 perilla plants! to be completely honest, i’ve never grown anything from a seed before in my life, and that probably would explain why i’ve been so enthusiastic about it. i really do feel like a mom…
the first thing that i’ve been doing after waking up is walking over to the windowsill to greet them. i wonder if they slept well, and am so overjoyed to see them perked up again after folding down and going to sleep at sundown the night before. when i look at the past six weeks since i first planted the seeds, it’s mind-boggling to me to think about how quickly they’ve grown, and how some dirt, water, and sunlight and genetic code in a seed can grow into something magnificent. y’all…nature has blown my mind.
i don’t want to overindulge in my plant parent feelings, but tending to these little guys has been incredibly meditative for me. is it just me, or do plants also help you clear some space in your brain to think about something else besides yourself or how this country feels like it’s going to the shitter?
i wanted to share this experience with anyone who is interested, so i decided to start mailing seeds to those who have reached out and have donated at least $5 to the Loveland foundation, an organization that funds therapy to black women and girls. if you haven’t already and you’re interested in growing your own and receiving some seeds, all you have to do is send me a screenshot of your donation and i’ll snail mail you 10 perilla leaf seeds :)
i also wanted to share what i learned in the process of growing perilla leaves on my windowsill. there are so many variables that can contribute to how your babies will thrive like the temperature, the amount of watering, the type of soil, the amount of sunlight, the time of year that you plant, etc. - but perilla leaves are known to be pretty sturdy and low maintenance so i’m optimistic for you! i hope these tips help jumpstart your own perilla parenting journey!
so without further ado, here are my novice tips on….
~ how to ~
grow perilla leaves *indoors*
supplies
perilla seeds
a plastic container
good potting soil: i used Fox farms organic potting mix
final pots that are at least 5 inches tall: the terra cotta ones that i used are here
day 1:
soak the seeds
in a shallow bowl, soak your perilla seeds in water
day 2:
find a container, toss in potting soil, plant your seeds, water, and place in a warm sunny spot!
find a clean carton that’s at least 3 inches high that you don’t mind puncturing small holes into. in the pictures below, i used one of those plastic trays that mushrooms come packaged in at the store. i also chose a black one because i have this silly theory that since black absorbs and retains more heat, a black carton will create an extra warm environment for the seeds to grow vs. any others (someone prove me right/wrong on this!!). i’ve seen people use egg cartons, milk cartons, delivery food containers, you name it!
anyways, using something sharp like a paring knife, carefully puncture a few small drainage holes (roughly the diameter of a chopstick) on the bottom side of your tray. lay in 1 inch of potting soil at the bottom. scatter your seeds - the further apart, the better - so that the roots don’t get tangled! then, *loosely* scatter 1/2 inch of soil on top.
set your container on top of a dish or something to catch any excess water. water your babies until the top layer of soil is dampened. then, place your seeds by the window where you get the most direct sunlight!
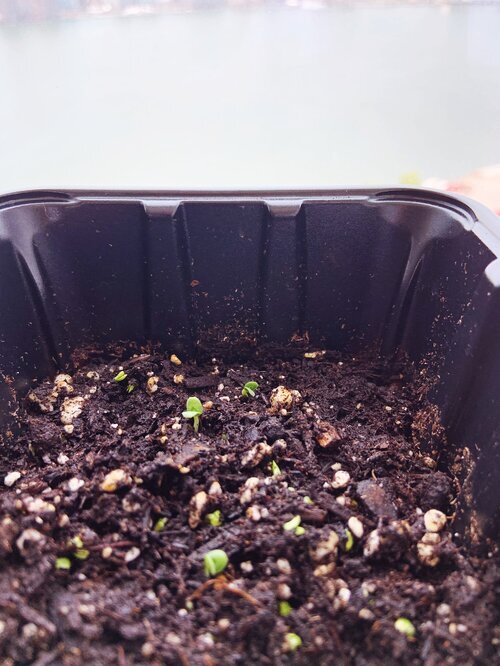
days 3-11:
germination period: meaning the seeds will open up a little tail called a radicle in the soil, develop that radicle into roots in the soil, sprout a little shoot through the soil, shed its seed coat, and grow into bigger baby shoots!
**continue to water once a day** and look for any signs of sprouting! once one sprouts, the others should sprout in the next day or two. heh, hooowww excitingggg!!!
day 5 and day 6:
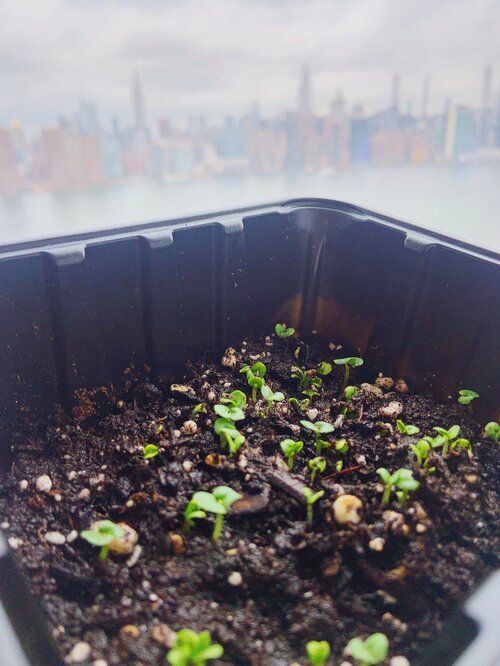
day 14 and day 17:
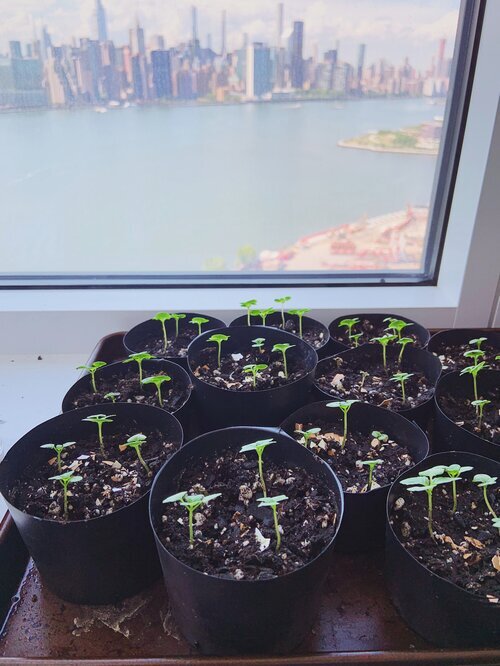
repot when your plants grow to about 1 inch tall
when the stems grow to about an inch tall, i’d recommend repotting into their final homes - otherwise, it’l be a nerve wracking process to untangle the roots. the terra cotta pots we ordered were delayed, so we went to the local gardening store and got these black planter cups (for free!) and repotted them temporarily until the pots arrived.
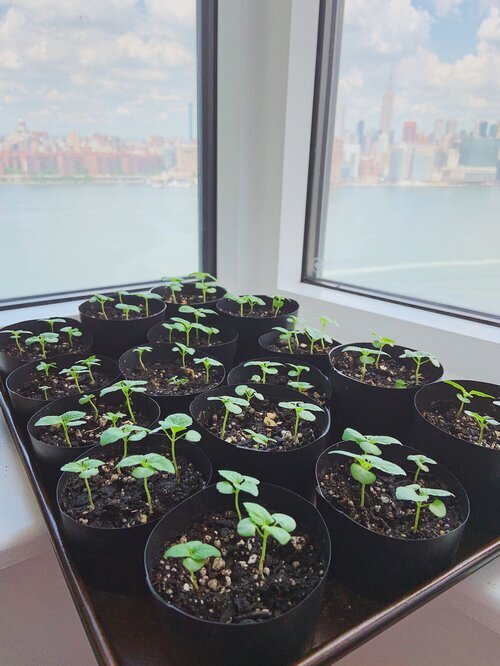
day 32:
overdue repotting day!
the pots finally arrived and we repotted the plants. each plant should be at least 6 inches apart, but i don’t have enough space on my windowsill so...yolo! i’ll let you know if this bites me in the butt later.

day 35 and day 40:
prune the baby arms!
hopefully your babies are now alive and thriving! i’d recommend snipping the small starter leaves because they are considered what i called as “return on investment negative”. they no longer will be collecting enough sunlight (since they’re at the bottom) and won’t grow any larger. although no longer useful to the overall plant, consider them as “micro greens” or “baby perilla”, snip them, and toss them into a salad or use them as garnish!

day 42:
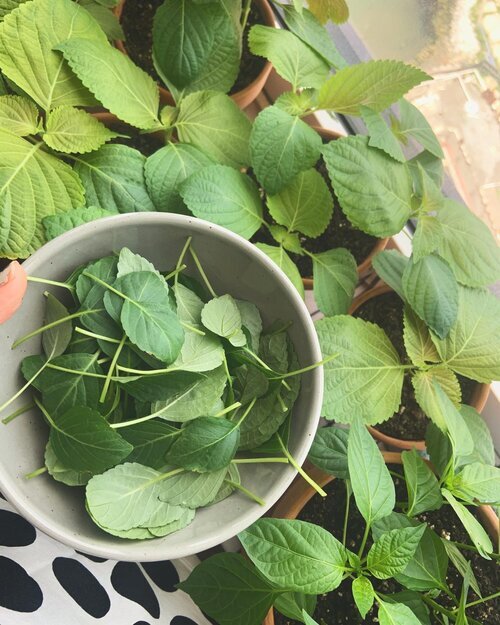
the first actual harvest!!!!
by now, your leaves should have grown to the size of your palm and you can snip off the bottom leaves leaving at least 2 centimeters away from the main stem. there will be 2 little sprouts that will grow from the side from where you snipped. keep those! this is where you’ll want to keep an eye on if you want to grow a rounded healthy perilla leaf bush.
day 50+?
check back in!
since i’m still pretty new to this, i’m learning what works and doesn’t - so stay tuned on what happens to these plants! i’ll definitely update this post as we go! :) enjoyyy!!!

